Blanket of Doom

Welcome to Doom


2 Comments

Book Purse

Lately, I’ve been somewhat obsessed with looking at book crafts on the internet, and naturally I had to create one of the fancy book purses that seem to be everywhere.

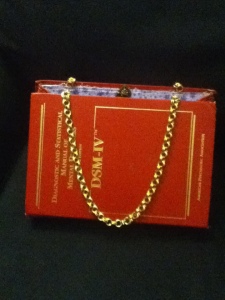
I mentioned it to my sister, who got super excited and asked me if I would be able to make one out of the DSM IV (she’s a newly graduated psychology major). It actually worked out pretty well. The book is nice and thick (it’d have to be to list all the ways you can be crazy), and the DSM V is coming out in September, so I was able to get an outdated copy very cheaply.

Psychiatry was one of my least favorite classes, so I had a lot of fun destroying this book.

I couldn’t find a tutorial I liked on making these. Most seemed to be written for people who can’t sew (or don’t like to). So I free styled it.

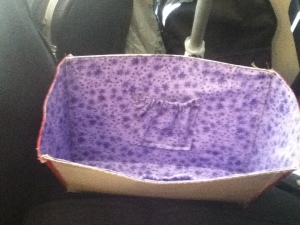
I created the inside of the purse using one piece of fabric the size of the book, which like my other book crafts was stitched onto a poster board backing for stability.

I created the pockets using trapezoid-shaped pieces of fabric, which I sewed on in the shape of a rectangle, using elastic at the top. This gave the pockets room to store a bit more than they would have had I sewed them straight onto the purse. It also let the tops of the pockets close a bit, which will hopefully keep the contents in a little better.

This is what it looked like with the sides attached, just prior to attaching the insides to the book.

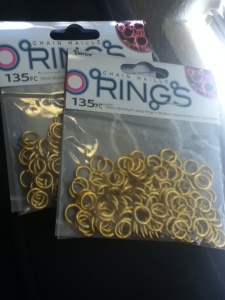
I really wanted a gold chain handle on the purse, but they only had one option in stock and it was way too expensive for what I wanted ($7 for one handle and the book only cost me $5). So on a hunch I went over one aisle to the jewelry section and found these rings. At $2 a package, they were perfect.

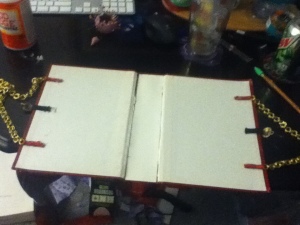
I used fabric strips to attach the purse handles to the book backing, and elastic to attach the clasps to give it a little extra give if needed. Additionally, in order to give the spine some extra stability, I glued a few layers of poster board. This may not be necessary for other books, this one just seemed so wobbly after I stabbed the pages out.

I finished it off by hot gluing the insides into the book cover.

It came out amazing, I’m so pleased with it.

So enjoy a few more photos.


Leave a comment

Travel Tech Organizer

In keeping with my recent interest in book crafts, I feel in love with this Vintage Book Travel Tech Organizer posted on Design Sponge, and decided that it was something I absolutely had to do. (Be sure to click the link for instructions on how she created her project).

In creating my version of the project, I decided to skip out on using rubberized fabric, but instead used cotton fabric to give it more color, plus the text speak fabric was just begging to be used in this kind of project.

Since the material I was using was less sturdy, I decided to put my elastic page on the right side of the book to stabilize it more.

Creating the elastic pattern was kinda fun, but it got tricky towards the bottom, as the elastic decided it wanted to take the fabric along with it.

I used the same text patterned fabric as the base for the entire book. You can’t really see it under the elastic, but it’s there.

Here are a few more progress photos just for fun.

I learned a few lessons from my last book project. I wanted to make sure that everything was attached well, so I used modge podge to attach the fabric to a poster board base, and while the modge podge was drying, I hand stitched the two together. It worked much better than last time in which I let the modge podge dry before the stitching. I also put electrical tape around the edges. It was mostly to keep the edges of the elastic from peeking out, but I decided to line the entire thing to make it look uniform. It had the added bonus of hiding my ugly stitching.

I’m really pleased with how this project turned out,I’m thinking of making a second one, but this time out of an old text-book. That way there would be a lot more room to hold more things!


1 Comment

Vintage Book Organizer

Recently, I happened across a post for an Activity Book created from an old book (be sure to click the link and check out the awesome tutorial). While I don’t have kids, it seemed like the perfect thing to create for my sister-in-law as she graduates high school and prepares to set off for college.

Finding the book to use for this project turned out to be a lot harder than I thought. I didn’t realize how many hard cover books were so plain-looking under their dust jackets. But I will admit that the looks I got while shopping were really hilarious, I guess most people don’t pick up book after book pealing back the dust jacket and putting it back.

My hard work paid off when I found this little gem at the Goodwill, and my patience was rewarded when at the checkout I learned that it was half-price Saturday. Hooray for $2 books.

Since the book is for a new college student,  I decided to add a few more pockets so that she could store a variety of things, such as a planner, an ID card, eraser, etc.

I pretty much followed the pattern for the DIY Activity Book.

The removal of the book pages from the book itself turned out to be much easier than I thought, since it wasn’t attached to the spine itself. It made a nice clean-cut.

Tho I will admit that seeing a gutted book was kinda sad. *moment of silence*

In order to give the project some extra stabilization, I used poster board to create some extra attachment points.

It also made sizing and cutting out the fabric background much easier, since the poster board was a little less floppy than the gutted book.

I loved the way the pencil holder didn’t have stitching along the bottom, so I created all the pockets by folding the fabric in half. While it used more fabric, it gave the pockets more give, which was good since the book didn’t allow for much flexibility.

The idea for the nested pockets came from this tutorial on a stationary holder.

To put everything together, I started by using modge podge to attach the fabric to the poster board, hand stitch the fabric to the poster board (since I always seem to have problems with the edges of projects pealing up), and then using modge podge to attach the poster board to the book itself.

In order to aid the stitching, I ran the poster board through the machine without any thread. While it seemed like a good idea at the time, the modge podge filled up the holes and I had to poke though them in order to get the stitches in.

When applying the modge podge, it started to leak through the fabric in some places, so in order to prevent the pockets from being attached forever, I used some pencils and pens to keep them propped up and away from the glue.

After attaching the poster board to the book , I used a case of soda to hold it down and let it dry overnight.

I don’t think all the layers of the modge podge and stitching were needed, but it doesn’t hurt I guess.

I think it turned out rather nice,  with all the colors and the fun pockets. I’m sure it will make my sister-in-law the envy of everyone in college.